Week 1
This week we accomplished some basic preliminary and organizational tasks. We've set up our blog and written our design proposal. A few of the pages are blank as of right now as we have no need for a FAQ page yet. This as well as the page titled tutorials will come as we move forward with the project. Once we have a physical product, we will be able to make videos and/or take photos with descriptive captions on how to use the product and play the game. So far we've brainstormed a few conceptual designs, planned our timeline for the project, and gotten approval on our idea from our adviser. As of right now, our design will consist of 9 tiles. This is subject to change as we research parts.
Week 2

This week we researched and ordered parts. They should be coming in within the next few days. Because of our tight timeline, we chose to go with slightly more expensive parts that would come sooner rather than cheaper parts that would come later. Because of this, we've decided to simplify our design so that it contains 3 tiles rather than 9. The game is based off of the same fundamental concept with more of a focus towards affordability and portability. Based on the timeline developed by the group, we would like to be testing our design by the end of week 6 so that we have time to improve it or order new parts if necessary. We have delegated tasks to different individuals/pairs. Our coding team is beginning to lay out a pseudocode that will continue to be developed as we move forward. Our construction team will be retrieving the materials they need this weekend in order to build the supporting structures to our design. The rough sketch provided gives a basic idea of where we are heading with our design. Again, we will probably go through many iterations of this design.
Week 3

Our parts have come in. We have tested all of the components and they are working properly. Our building team acquired the wood they needed and are taking measurements of the sensors as well as drawing a more detailed design of the apparatus that will encase the hardware.The coding team is transitioning our pseudocode to actual code within the Arduino Software. A picture of our pseudocode can be seen on the right. We have also included pictures of the preliminary design of a sensor hood we will 3D print and the dimensions of the color sensor that we took down in order to make this design.

Week 4
This week we have accomplished, writing roughly 75% of the code, having converted it from the pseudocode we developed in week 2. In the process, we are tweaking it as our coding team sees fit. Our building team is developing an initial design and blueprint for the table top that will encapsulate the hardware.
Week 5
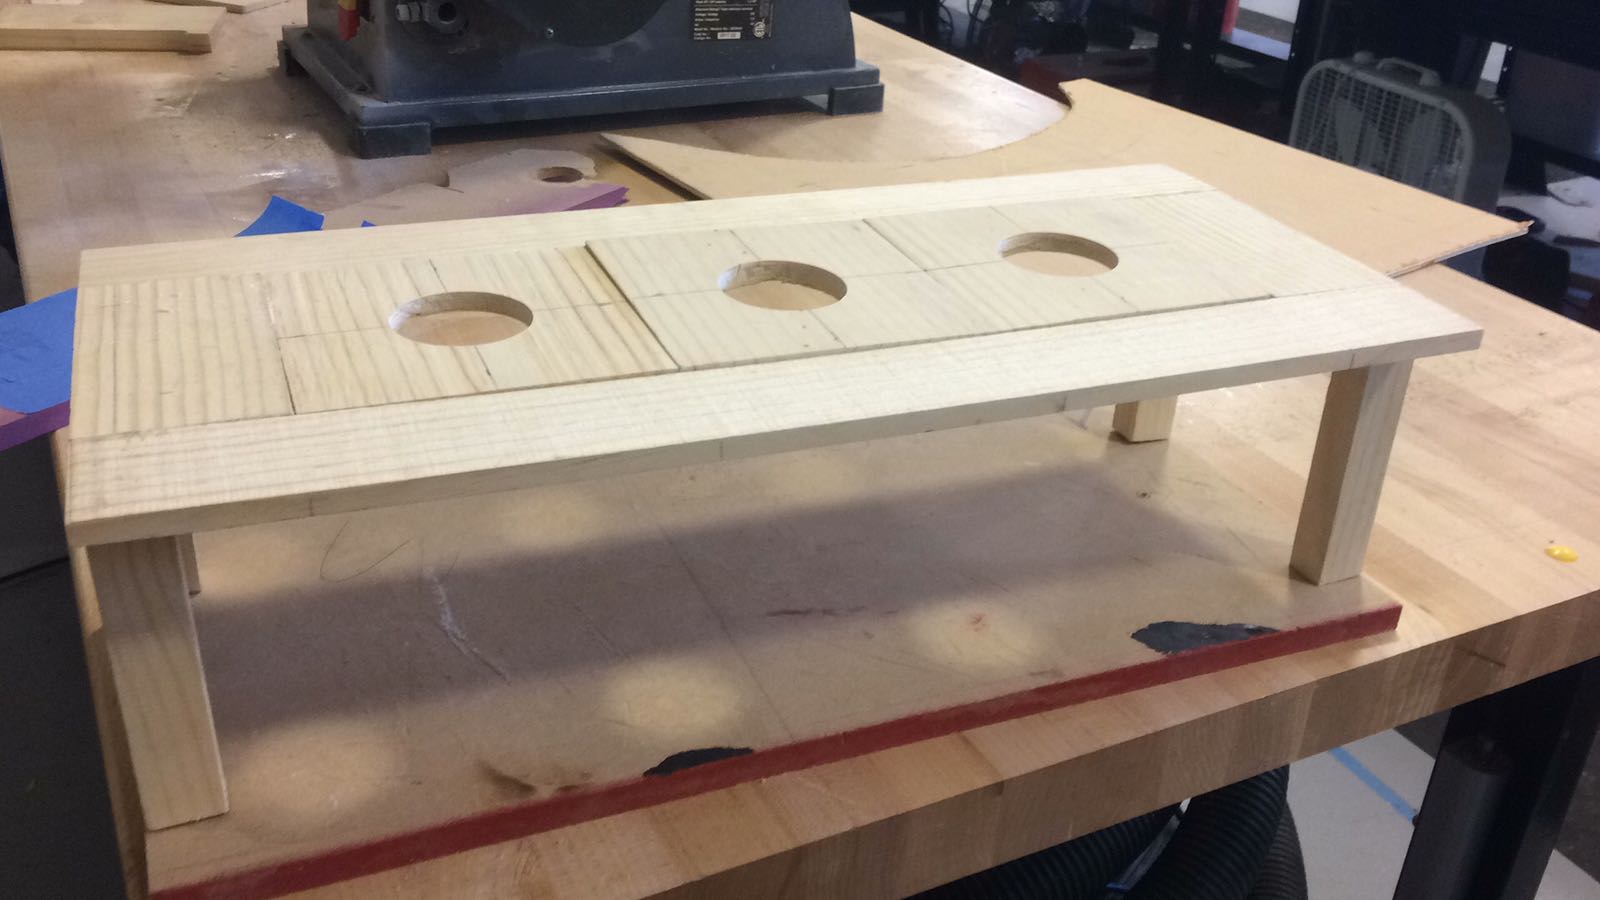
Over the weekend, our building team cut out all of the wood at the dimensions we developed in the blueprints. The size of the holes needed to be drill pressed into the top is being determined by a collaboration with the coding team who set up the circuit this weekend. This hole will have to also match the dimensions of the sensor hood. The sensor hood is a 3D printed part that will protect the color sensor. Its initial design was created in week 3 but the dimensions may need to be changed to fit into whatever size hole is drill pressed into the rest of the wood. All of the pieces of wood that were cut out have to be glued together this week. Our coding team also noticed that there is too much of a time delay in one section of the code and not enough of a delay in another section of the code as they performed some preliminary testing so they will be working on fixing whatever bugs are in it this week and next. We discussed with our professor possible solutions to these bugs and will try to incorporate his suggestions. He also brought up some possible concerns we have to consider such as the bouncing of the signal received by the sensor and code that should be incorporated to debounce the signal.
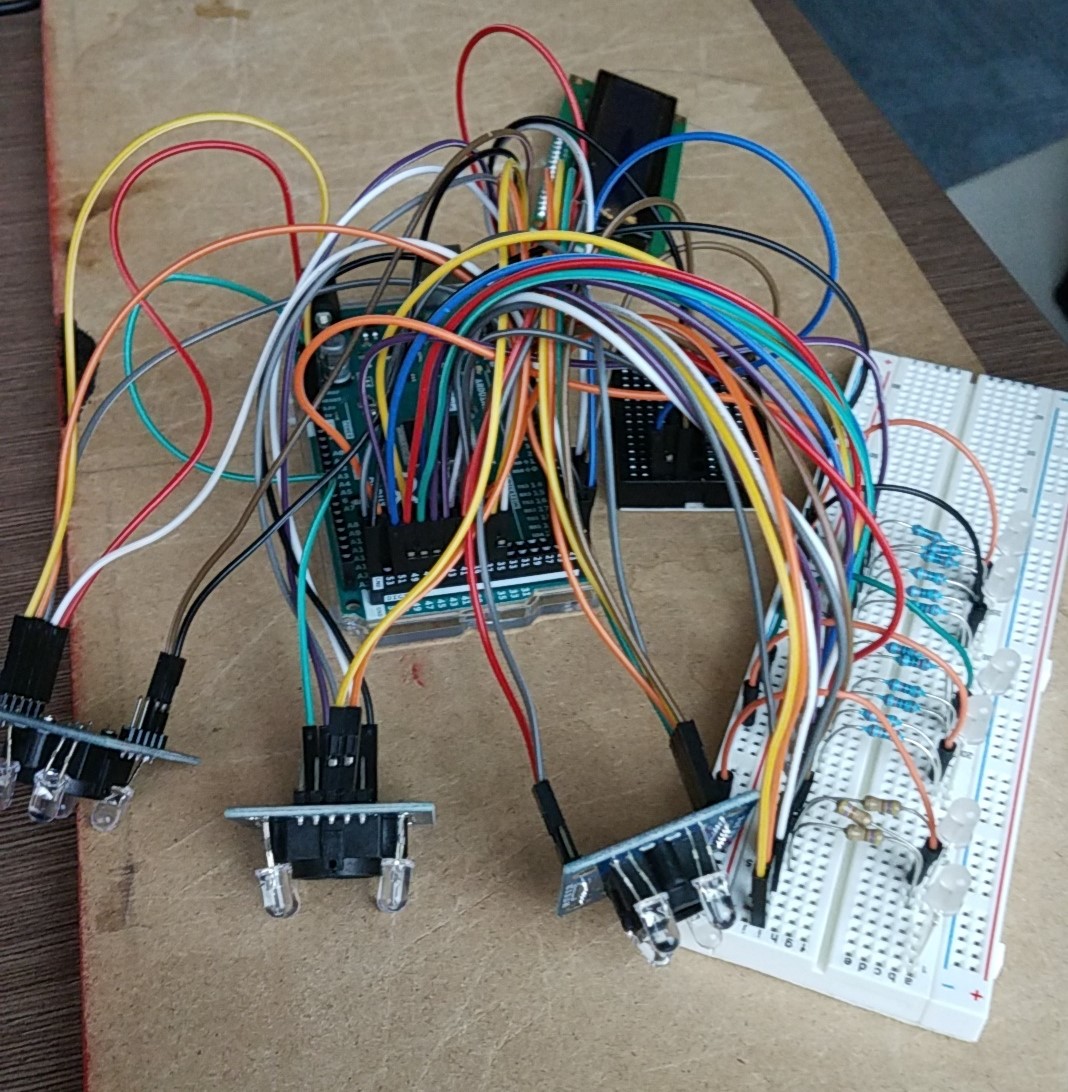
Week 6
Our code for level one is fully functioning at this point. A picture of our preliminary circuit can be seen below. It will need to be adjusted so that the wires are neater and more organized We may or may not add a second level to the game but we want to focus on assembling our prototype and making sure that it is working. We've taken a video and posted it to the tutorial page of this website. The tabletop is mostly put together. The holes still need to be drill pressed and the sensor hood needs to be printed. We will begin drafting our Final Report this week and hopefully have a fully functioning prototype by the end of week 8.
Week 7
This week we are working on the 2nd level of the game. The pseudocode is fully written and being transitioned into the actual arduino code that we will test when we meet outside of class. The sensor hood was printed but we decided that we wanted it to be flush against the wood rather than protruding. Also, the inner dimensions made the hood slightly too thick which impeded upon the color sensors so we adjusted the design and reprinted. The before and after of our designs can be seen below. The color change is simply because a different colored filament was in the printer.


We also drilled the holes in the tiles so that RGBs could come through the board and display which tile the player should be placing the block on. In order for there to be the proper dimensions for the RGBs we designed and printed a cap with a conical interior so that the leads of the RGBs could be spread underneath the board to accept the female ends of the 4 wires they have to be connected to. The 3D model and how they are flush with the wood can be seen below.
Week 8
We're done! The code for both levels has been written. The circuitry is fully complete. The game board is fully put together. Everything is glued and locked in place. Tutorial and demonstration videos as well as annotated photos of all of the key components can be found on the tutorial page of this website. Frequently asked questions are answered on the FAQ page but if there is anything else you are interested in, feel free to reach out to any of our team members. Our emails are listed in the about us section!

 Our parts have come in. We have tested all of the components and they are working properly. Our building team acquired the wood they needed and are taking measurements of the sensors as well as drawing a more detailed design of the apparatus that will encase the hardware.The coding team is transitioning our pseudocode to actual code within the Arduino Software. A picture of our pseudocode can be seen on the right. We have also included pictures of the preliminary design of a sensor hood we will 3D print and the dimensions of the color sensor that we took down in order to make this design.


Comments
Post a Comment